
Showing posts with label Rigging & Hoisting. Show all posts
Showing posts with label Rigging & Hoisting. Show all posts
Tuesday, 11 November 2025
Friday, 25 April 2025
Tuesday, 25 March 2025
Sunday, 23 March 2025
Sunday, 2 March 2025
Thursday, 2 January 2025
Rigging Always Plays A Major Role At Workplace
Rigging Always Plays A Major Role At Workplace

Individuals responsible for carrying out rigging should be
experienced professionals, who thoroughly understand the rigging and its
procedures. Safety is the most significant aspect of rigging. After all, the
main purpose of rigging is to help reduce or eliminate injuries and accidents.
The following are the six most important rigging hardware used for crane operations.
Rigging Hooks
Hooks used in rigging are designed to lift heavy objects and
eliminate slippage, depending on the materials being moved. Rigging hooks are
made of forged alloy steel and chosen based on safe weight load indication and
have multiple types: sorting, eye, clevis grab and choker. Hooks are available
based on throat, or hook opening, size and range from 5/8″ to 1 17/32″.
Shackles
Loads exceeding 6,000lbs may require shackles, which are
forged with alloy pins and can accommodate loads up to 11,000lbs. Shackles are
available in sizes from 3/16″ to 2 ½” and come in anchor or chain types. Screw
pin, round pin and safety type anchor and chain shackles are available.
Eye Bolts & Steel Nuts
Selection of eye bolts depends on angle loading factors,
typically 30, 60 or 90 degrees. Eye bolts are commonly used for looping cable
or wire and thus must be strong enough to accommodate the required load.
Different types of straight and shoulder eye bolts are used in rigging
equipment including nut, eye, machinery and screw which vary in size from 1/4″
to 2″. Nuts are used in conjunction with eye bolts and are made of steel. The
dimensions chosen for both eye bolts and nuts are dependent upon the load’s weight,
shape and specifications.
Wire Ropes
Large materials can be moved with wire ropes and slings. The
most commonly used wire ropes are fortified by multiple strands of stainless
steel or carbon steel wire ropes arranged in a helix pattern. Wire ropes can be
coated or not, galvanized and are available in multiple specifications. The
most common classifications are 6×26, 7×7 and 7×19.
Synthetic Slings
Used in conjunction with wire ropes, slings are available in
endless and eye-and-eye styles. Synthetic material is used to create the sling
itself while eye-and-eye slings feature metal triangular ends with or without a
choker. Some eye-and-eye slings do not have metal triangle loops; instead, they
feature a flat or twisted eye that is also made of synthetic material.
Pulleys & Blocks
A requirement for very heavy loads, lifting blocks and
pulleys mitigate weight to simplify the process of maneuvering heavy objects.
The most common type of block is the snatch block, but other options include
tilt-up blocks and logging blocks. Wire rope is typically used with blocks.
Blocks are easy to deploy and available in multiple sizes to accommodate up to
30 tons. Pulleys, available in single and double types, are often used with
synthetic rope and typically carry lighter loads than lifting blocks. Pulley
selection is based on rope, frame and sheave size.
Saturday, 31 August 2024
RH : Material Hoisting - Mobile Crane
Material Hoisting - Mobile Crane

Many incidents were reported while using Hydra type cranes as the stability is less during operations.
Below are some safety tips related to crane operations.
- Cranes are to be operated only by qualified and trained personnel.
- All equipment used shall have test certificates & in good condition (Crane, Forklift, etc.) Site in-charge / Engineer must inspect the crane visually before use.
- Ensure that crane is on a firm/stable surface and level & outriggers are fully extended.
- Workers must not ride on a load or hook.
- Barricade the working area / accessible areas within the crane's swing radius.
- Pathway clear for the movement and has sufficient illumination.
- Watch for overhead electric power lines and maintain at least a 10- foot safe working clearance from the lines.
- Tools and tackles used (Slings, D-Shackles, Trolleys, Hydraulic Jacks, etc.) shall have test certificates
- Inspect all rigging tools and tackles prior to use.
- Be sure to use the correct load chart for the crane's current configuration and setup, the load weight and lift path.
- Do not exceed the load chart capacity while lifting.
- Raise load a few inches, hold, verify capacity/balance, and test brake system before proceeding.
- Do not move loads over people.
- Do not walk under suspended loads.
- Be sure to follow signals (by the aid of signalman) and manufacturer instructions while operating cranes.
RH : Importance of Web Sling Inspection
Importance of Web Sling Inspection

Hoisting and rigging is a vital and common work task in many workplaces. Slings are devices used to lift and move items mechanically. At times, they can be put under great stress which can lead to damage.
This safety talk identifies common sling failures and covers best practices when inspecting these devices to ensure a safe working experience.
 Common Web Sling Failures

- Slings can break apart when overloaded.
- Slings can stretch and fray over time.
- Slings exposed to cutting and grinding, along with welding splatter, can become burned and compromised.
- Slings exposed to chemicals can deteriorate.
- Slings that are continually wet or left in direct sunlight for extended periods can rot and disintegrate.
Inspection of Web slings
- Slings should be inspected for burnt marks and unraveled threads.
- When inspecting slings, if red nylon fibers are visible, the sling should be removed from service.
- Slings that are discolored and stiff should be removed from service as that is an indicator of chemical exposure.
- Slings that are rigid and unable to move freely show signs of excessive UV exposure.
- Threads that frayed and rotted indicate the sling should be removed from service.
- Slings that are missing tags complete with loading capacity are no longer compliant and should not be used in the workplace.
- Slings should be inspected before use. Inspection should occur throughout the workday if the sling is being used over and over.
- Slings should also be inspected monthly and annually as part of a comprehensive safety inspection process.
Summary
Inspecting slings is a good practice that allows user to identify possible issues with the sling prior to use.
If issues are identified, it is vital to stop work and get a functional sling for the work task at hand. A simple inspection may make all the difference in preventing property loss or injury.
RH : Powered Winches Machines and Accosiated Hazards
Powered Winches Machines and Accosiated Hazards

Advantages of using winch machine instead of cranes can include:
- Lower operating costs
- The equipment is lighter and more portable
- The smaller size permits use in tight spots—they’re ideal for use inside buildings.
Winch machine can be used for both hoisting (vertical lift) and hauling (horizontal or vertical incline pulls). They may be powered hydraulically, electrically, by compressed air or by an internal combustion engine. The most common winch seen in construction are electric winches (for light lifting and pulling), and air-powered winches (for heavier loads). Wire rope is used for heavy applications while fibre rope is used for lighter applications.
Examples of winch use in construction include pulling electrical cables, moving heavy machinery, lifting vessels, and installing structural steel.
Winch machine are often used with other rigging attachments. The most common attachments include snatch blocks, sheaves, and rollers. Snatch blocks and sheaves are used to change the direction of pull while rollers are used to support the load.
Winch machines operations involve rigging. Because of this, the hazards associated with rigging operations will also be present while operating a winch machine. A very important element in winch operation safety is preplanning. Many difficulties can occur during a lift, such as an unexpected shift of the load’s centre of gravity. Planning for an adequate safety factor in, for example, the rigging components and anchor points, will avoid failures and potential catastrophe during winch use. Thorough planning of a lift will help you prepare for difficulties that may arise.
Hazards associated with tugger operation
The kinds of hazards a worker is likely to be exposed to during tugging operations are similar to those in rigging applications. Check for the following hazards, as well as conditions that can create hazards:
- Poor communication.
- Lack of training.
- Overloading.
- Failure of tugger and rigging assembly.
- Fall hazards.
- Failure of anchorage points of the winch or rigging components.
- Shifting or other movement of the tugger or point of anchorage when under load.
- Brake failure when under load.
- Unexpected movement of the equipment which can strike or crush a worker handling the load.
- The moving drum and sheaves which can pinch or crush a worker’s hand.
- Loose clothing or jewellery caught in drum or sheaves.
- Electrical hazards when using electrically powered winches.
- Carbon monoxide from combustion by-products in confined spaces.
- Fire or explosion (if operated in an area of combustible products).
- Exposure to hydraulic fluid from hoses breaking or leaks.
- Improper purging of hydraulic lines.
- Rope coming off the drum.
- Area not isolated from other workers or public during hoisting or hauling.
A winch machine must generate enough pull through the load line to lift, move, or hold the load and any associated rigging. In addition to this pull, there is also stored “potential” energy in the system. A failure in the rigging system can result in a violent whipping of the lift line due to release of this stored energy, and the release of the load. It's of paramount importance to ensure that all rigging and all points of anchorage are able to safely handle all loads, or all potential loads, to which they might be subjected.
All rigging components and points of anchorage may be subjected to forces greater than the weight of the load. It should to check and certified at regualr intervals by competent person and records to be maiantained as per local country requirements.
RH : Rigging Hardware & Its Failure
Rigging Hardware & Its Failure
Explain dangers:

- Rigging is only as strong as its weakest link. Workers’ lives depend on the strength of that link.
- It doesn’t matter what safe working load is stamped on a hook if the hook is cracked and twisted or opening up at the throat. It can’t deliver its full rated capacity.
- Inspection is vital in rigging and hoisting.
Identify controls:
- Rigging hardware must have enough capacity for the job. Only load - rated hardware of forged alloy steel should be used for hoisting. Load - rated hardware is stamped with its working load limit or WLL.
- Adequate capacity is the first thing to look for in rigging hardware. For hoisting, the design factor must be 5 to 1.
- Once the right hardware has been chosen for a job, it has to be inspected regularly as long as it’s in service.
There are warning signs that hardware has been weakened in use and should be replaced.
- Cracks:- Inspect closely —some cracks are very fine.
- Missing parts:- Make sure that parts such as clips, and cotter pins in shackle pins are still in place.
- Stretching:- Check hooks, shackles, and chain links for signs of opening up, elongation, and distortion.
- Stripped threads:- Inspect turnbuckles, shackles, and cable clips
Demonstrate:
Using samples of hardware on site, review the following points.
Cable Clips
- Check for wear on saddle.
- Check that original parts are in place and in good condition.
- Check for cracks.
- Check for proper size of the wire rope.
Shackles
- Check for wear and cracks on saddle and pin.
- Check that pin is straight and properly seated.
- Check that legs of shackle are not opening up.
Hooks
- Check for wear, twisting, and cracks.
- Make sure that hook is not opening up.
Turnbuckles
- Check for cracks and bends.
- Check rods for straightness and damage to threads.
With your crew, inspect rigging hardware in use or stored on site. Arrange for repairs or
Replacement of any damaged or defective items.
Rigging Failure
Every year workers lose their lives as a result of improper rigging or rigging failure that allowed a load to fall while being hoisted. Some deaths occur when the load slips from the rigging, when the rigging breaks and allows the load to fall, and when the load breaks into pieces and falls while being lifted.

Always exercise caution when working around:
- Inspect all rigging prior to use to minimize the possibility of rigging failure.
- Look for hazardous conditions such as wire rope deformation, strain, binding, or kinking.
- Do not wrap hoist lines around the load.
- Know the rated capacities of rigging and slinging and use the proper size.
- Ensure that loads are rigged to minimize the potential for dropped loads.
- Do not exceed the load chart capacity while making lifts.
- Determine a safe location to stand to avoid being struck by the load if rigging fails, or the load shifts while making lifts.

RH : Rigging Safety Rules & Tips
Rigging Safety Rules & Tips
Common Rigging Safety Rules will help you remember some of the most important safe rigging practices.
- Be sure to establish the weight of the load.
- Determine the proper type of hitch based on the type of load.
- Understand the relationships between angles and tension as they pertain to slings and hardware. If you don’t understand the relationships, or if you have any questions, check with your supervisor before you proceed.

- Make sure that you select the right sling for the job based on the type of load to be lifted.
- Also, select the right hardware based on the type of load and the type of sling or slings that will be used for the lift.
- Inspect each sling before you use it. Never use a defective sling. Take defective slings out of service immediately and follow your company’s procedure for handling defective equipment.
- Inspect all rigging hardware before you use it. Never use defective hardware.Take defective hardware out of service immediately and follow your company’s procedure for handling defective equipment.
- As you rig the load, protect slings from cuts and tears.
- Determine the load’s center of gravity.
- Pay close attention to detail at the time of the lift.

Rigging Safety Tips
Here are some safety tips for some of the common mechanical construction industry rigging applications
- Never tie two or more slings together.
- Always connect two slings with an appropriate-sized shackle.
- Never attach a sling directly to a lifting lug. Always use a shackle.
- Likewise, never run a sling through a set of lifting lugs or eye-bolts. Doing so creates too much tension on the lugs or eye-bolts.
- Never choke below the threads on synthetic web slings.

- Take wire rope slings out of service immediately if they become defective. A wire rope is defective if there are five or more broken wires in one rope lay and/or three or more broken wires in one strand of one rope lay, (a rope lay is the length along the rope where one strand makes a complete revolution around the rope).
- Some companies have established a policy that wire rope is defective when a single wire breaks. Check with your supervisor about your company’s policy before using wire rope slings.
- “Never saddle a dead horse.” When using wire rope clips be sure to attach the wire rope clips with the inside curve of the U -bolt up against the very end(dead end) of the wire, and the inside of the U-bolt clip (saddle) up against the live end of the wire.

Blind Lifting
Blind lifting refers to a lifting operation where the load or the lifting area is not visible to the crane operator or the rigging team. This often occurs in situations where obstacles, such as walls or equipment, block the line of sight.
To ensure safety during blind lifts, communication is critical, typically involving:
- Spotters or signalers to guide the operator.
- Two-way radios for clear instructions.
- Pre-lift planning to identify potential hazards.
Here are more safety tips for some of the common mechanical construction industry rigging applications.
- Never allow a synthetic sling to bunch up on a shackle.
- Always use the right size shackle for the job. For example, a 1 inch shackle is too small to use with a 1 ½ inch wire rope sling. However, a 2 inch shackle works safely with a 1 ½ inch wire rope sling.
- Never make a shackle to shackle connection.
- Be sure to use a safe shackle orientation. Don’t allow the inside loop of a wire rope sling to place tension on a shackle pin directly where the pin screws into the shackle or directly where the pin comes through the hole on the opposite side of the shackle. Doing so would place too much tension on the shackle ears.
- Never orient two slings in a shackle so that they would pull the shackle in opposite directions that are parallel to the shackle pin.
- Be sure not to orient a shackle/sling on a shackle pin in a manner that could result in the shackle pin becoming unscrewed during the lift.
- Make sure that you choose the right size sling/sling loop based on the size of the crane or derrick hook.
- Be sure not to “point load” crane or derrick hooks. The rated capacity of the hook decreases as the angle increases and the load moves out away from the center of the hook.
RH : Rigging - Fiber Ropes, Knots and Hitches
Readily available in a wide variety of synthetic and natural fiber materials, these ropes may be used as:-
- Slings for hoisting materials.
Hand lines for lifting light loads.
- Taglines for helping to guide and control loads.
There are countless situations where the rigger will be required to tie a safe and reliable knot or hitch in a fiber rope as part of the rigging operation. Fastening a hook, making eyes for slings, and tying on a tagline are a few of these situations.
This section addresses the correct selection, inspection, and use of fiber rope for hoisting and rigging operations. It also explains how to tie several knots and hitches.
Characteristics:
The fibers in these ropes are either natural or synthetic.Natural fiber ropes should be used cautiously for rigging since their strength is more variable than that of synthetic fiber ropes and they are much more subject to deterioration from rot, mildew, and chemicals.
Polypropylene:
Is the most common fiber rope used in rigging. It floats but does not absorb water. It stretches less than other synthetic fibers such as nylon. It is affected, however, by the ultraviolet rays in sunlight and should not be left outside for long periods. It also softens with heat and is not recommended for work involving exposure to high heat.
Nylon:
This fiber is remarkable for its strength. A nylon rope is considerably stronger than the same size and construction of polypropylene rope. But nylon stretches and hence is not used much for rigging. It is also more expensive, loses strength when wet, and has low resistance to acids.
Polyester:
This ropes are stronger than polypropylene but not so strong as nylon.They have good resistance to acids, alkalies, and abrasion; do not stretch as much as nylon; resist degradation from ultraviolet rays; and don’t soften in heat.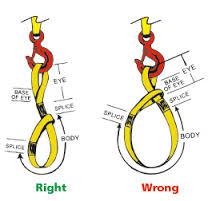
All fiber ropes conduct electricity when wet. When dry, however, polypropylene and polyester have much better insulating properties than nylon.
Inspection:
Inspect fiber rope regularly and before each use. Any estimate of its capacity should be based on the portion of rope showing the most deterioration.
Check first for external wear and cuts, variations in the size and shape of strands, discoloration,
and the elasticity or “life” remaining in the rope.
and the elasticity or “life” remaining in the rope.
Untwist the strands without kinking or distorting them. The inside of the rope should be as bright
and clean as when it was new. Check for broken yarns, excessively loose strands and yarns, or an
accumulation of powdery dust, which indicates excessive internal wear between strands as the
rope is flexed back and forth in use.
and clean as when it was new. Check for broken yarns, excessively loose strands and yarns, or an
accumulation of powdery dust, which indicates excessive internal wear between strands as the
rope is flexed back and forth in use.
If the inside of the rope is dirty, if strands have started to unlay, or if the rope has lost life & elasticity, do not use it for hoisting.
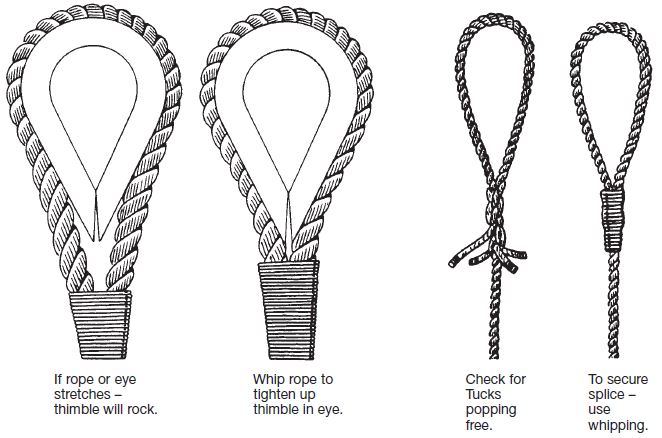
Check for distortion in hardware. If thimbles are loose in the eyes, size the eye to tighten the
thimble (Figure 2.1). Ensure that all splices are in good condition and all tucks are done up (Figure
2.2).
 (Figure 1.1) (Figure 1.2)
thimble (Figure 2.1). Ensure that all splices are in good condition and all tucks are done up (Figure
2.2).
(Figure 1.1) (Figure 1.2)
Working Load Limit:
The maximum force that you should load a component is the working load limit (WLL). The WLL incorporates a safety factor (SF). The SF provides additional protection above the manufacturer’s design factor (DF). The design factor is the safety factor to which the manufacturer builds. The SF and DF do not provide added capacity. You must never exceed the WLL.
- Let’s calculate the WLL of a chain or gin wheel rated at 1000 pounds with a manufacturer’s DF of 3.
Note: Section 172 (1) (d) of the Construction Regulation requires a SF of 5.
This requirement is greater than our DF, so the capacity must be reduced accordingly.
WLL = 1000 pounds (rated capacity) x 3 (DF) / 5 (SF)
WLL = 600 pounds
In this example, the chain or gin wheel has a stamped capacity of 1000 pounds, but, in compliance
with the Construction Regulation, it can safely lift a maximum capacity of 600 pounds.
with the Construction Regulation, it can safely lift a maximum capacity of 600 pounds.
Fiber Rope Selection:
Select the size and type of rope to use based on manufacturer’s information; conditions of use; and the degree of risk to life, limb, and property. The WLL of fiber rope is determined by multiplying
the working load (WL) by the SF. The minimum breaking strength (MBS) is the force at which a new rope will break.
the working load (WL) by the SF. The minimum breaking strength (MBS) is the force at which a new rope will break.
The manufacturer’s DF provides a layer of safety that has been determined by the manufacturer.
The SF, if greater than the DF, adds an additional layer of safety to meet the requirements of users
and regulators. Together, these added layers of safety provide protection above the MBS to account for reduced capacity due to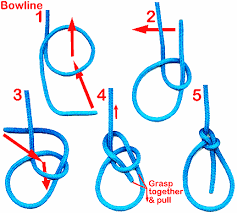
The SF, if greater than the DF, adds an additional layer of safety to meet the requirements of users
and regulators. Together, these added layers of safety provide protection above the MBS to account for reduced capacity due to
- wear, broken fibers, broken yarns, age
- variations in construction size and quality
- shock loads
- minor inaccuracies in load weight calculations
- variances in strength caused by wetness, mildew, and degradation
- yarns weakened by ground-in or other abrasive contaminants.
If you notice rope that is defective or damaged, cut it up to prevent it from being used for hoisting.
Let’s calculate the WLL of a rope to lift a WL of 250 pounds.
Let’s calculate the WLL of a rope to lift a WL of 250 pounds.
Note: Section 172 (1) (d) of the Construction Regulation requires a minimum SF of 5.
For more critical lifts that could risk life, limb, or property, a SF of 10 to 15 may be necessary.
WLL = 250 pounds (WL) x 5 (SF)
WLL = 1,250 pounds
In this example, to meet the WLL you must use a rope with an MBS of 1,250 to hoist or lower a WL of 250 pounds. See manufacturers’ specifications to select the appropriate type of rope.
Care:
- To unwind a new coil of fiber rope, lay it flat with the inside end closest to the floor. Pull the inside end up through the coil and unwind counterclockwise.
- After use, recoil the rope clockwise. Keep looping the rope over your left arm until only about 15 feet remain. Start about a foot from the top of the coil and wrap the rope about six times around the loops. Then use your left hand to pull the bight back through the loops and tie with a couple of half hitches to keep the loops from uncoiling ( Figure 2.5).

( Figure 1.3)
- Remove kinks carefully. Never try to pull them straight. This will severely damage the rope andreduce its strength.
- When a fibre rope is cut, the ends must be bound or whipped to keep the strands from untwisting. Figure 2.4 shows the right way to do this.
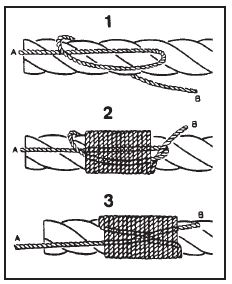
Figure 1.4
Storage:
- Store fiber ropes in a dry cool room with good air circulation – temperature 10-21°C (50-70°F) humidity 40-60%.
- Hang fiber ropes in loose coils on large diameter wooden pegs well above the floor (Figure 2.5).

(Figure 1.5)
- Protect fiber ropes from weather, dampness, and sunlight. Keep them away from exhaust gases, chemical fumes, boilers, radiators, steam pipes, and other heat sources.
- Let fiber ropes dry before storing them. Moisture hastens rot and causes rope to kink easily. Let a frozen rope thaw completely before you handle it. Otherwise fibers can break. Let wet or frozen rope dry naturally.
- Wash dirty ropes in clean cool water and hang to dry.
Use:
- Never overload a rope. Apply the design factor of 5 (10 for ropes used to support or hoist personnel). Then make further allowances for the rope’s age and condition.
- Never drag a rope along the ground. Abrasive action will wear, cut, and fill the outside surfaces with grit.
- Never drag a rope over rough or sharp edges or across itself. Use softeners to protect rope at the sharp comers and edges of a load.
Avoid all but straight line pulls with fiber rope. Bends interfere with stress distribution in fibers.
- Always use thimbles in rope eyes. Thimbles cut down on wear and stress.
- Keep sling angles at more than 45°. Lower angles can dramatically increase the load on each leg (Figure 1.6). The same is true with wire rope slings.
- Never use fiber rope near welding or flame cutting. Sparks and molten metal can cut through therope or set it on fire.
- Keep fiber rope away from high heat. Don’t leave it unnecessarily exposed to strong sunlight, which weakens and degrades the rope.
- Never couple left-lay rope to right-lay.
- When coupling wire and fiber ropes, always use metal thimbles in both eyes to keep the wire rope from cutting the fiber rope.
- Make sure that fiber rope used with tackle is the right size for the sheaves. Sheaves should have diameters at least six – preferably ten – times greater than the rope diameter.
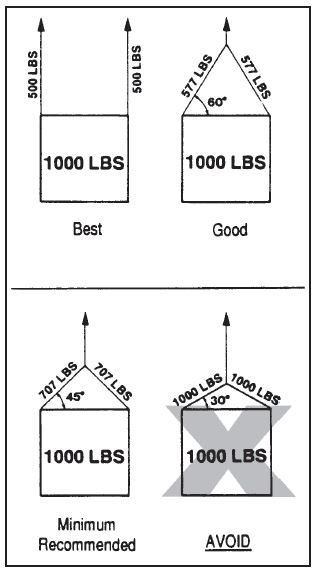
(Figure 1.6)
Knots:
Wherever practical, avoid tying knots in rope. Knots, bends, and hitches reduce rope strength considerably. Just how much depends on the knot and how it is applied. Use a spliced end with a hook or other standard rigging hardware such as slings and shackles to attach ropes to loads.
In some cases, however, knots are more practical and efficient than other rigging methods, as for lifting and lowering tools or light material.
For knot tying, a rope is considered to have three parts (Figure 1.7).

(Figure 1.7)
The end is where you tie the knot. The standing part is inactive. The bight is in between.
Following the right sequence is essential in tying knots. Equally important is the direction the end is to take and whether it goes over, under, or around other parts of the rope.
There are overhand loops, underhand loops, and turns (Figure 1.8).

Overhand Loop Underhand Loop Turn
WARNING – When tying knots, always follow the directions over and under precisely. If one part of the rope must go under another, do it that way. Otherwise an entirely different knot – or no knot at all – will result.
Once knots are tied, they should be drawn up slowly and carefully to make sure that sections tighten evenly and stay in proper position.
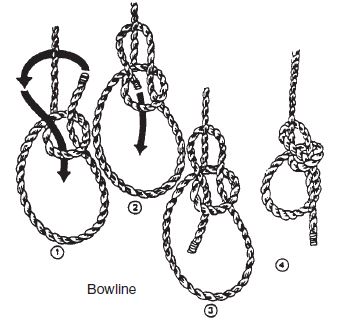
Bowline:
Never jams or slips when properly tied. A universal knot if properly tied and untied. Two interlocking bowlines can be used to join two ropes together. Single bowlines can be used for hoisting or hitching directly around a ring.
Bowline on the Bight
Used to tie a bowline in the middle of a line or to make a set of double-leg spreaders for lifting pipe.
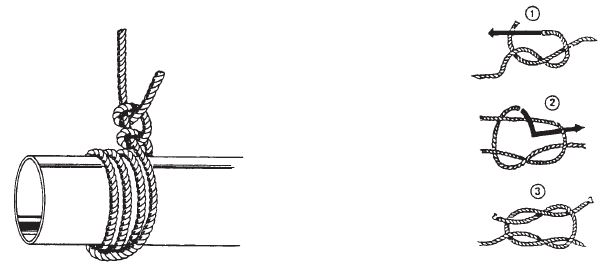
Pipe Hitch:
Reef or Square Knot:
Can be used for tying two ropes of the same diameter together. It is unsuitable for wet or slippery ropes and should be used with caution since it unties easily when either free end is jerked. Both live and dead ends of the rope must come out of the loops at the same side.
Two Half Hitches:
Two half hitches, which can be quickly tied, are reliable and can be put to almost any general use.
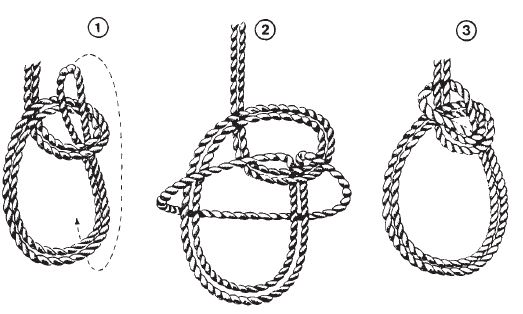
 Running Bowline:
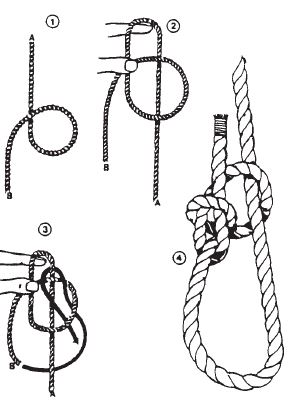
The running bowline is mainly used for hanging objects with ropes of different diameters. The weight of the object determines the tension necessary for the knot to grip.
Make an overhand loop with the end of the rope held toward you
- Hold the loop with your thumb and fingers and bring the standing part of the rope back so that it lies behind the loop
- Take the end of the rope in behind the standing part, bring it up, and feed it through the loop
- Pass it behind the standing part at the top of the loop and bring it back down through the loop.
Figure-Eight Knot:
This knot is generally tied at the end of a rope to temporarily prevent the strands from un-laying.
The figure-eight knot can be tied simply and quickly and will not jam as easily as the overhand knot.
It is also larger, stronger, and does not injure the rope fibers. The figure-eight knot is useful in preventing the end of a rope from slipping through a block or an eye.
It is also larger, stronger, and does not injure the rope fibers. The figure-eight knot is useful in preventing the end of a rope from slipping through a block or an eye.
To tie the figure-eight knot, make an underhand loop
- Bring the end around and over the standing part
- Pass the end under and then through the loop
- Draw up tight.
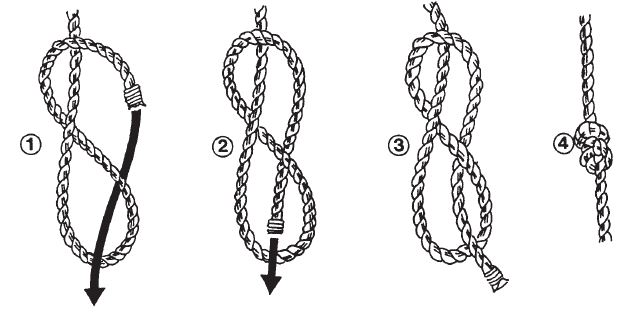
Figure Eight Knot
Subscribe to:
Comments (Atom)
Convey the Right Safety Information About Conveyors
www.safetygoodwe.com Convey the Right Safety Information About Conveyors Employees should be familiar with these basic ...

-
 www.safetygoodwe.com Rigging Always Plays A Major Role At Workplace Rigging is the most imperative aspect of lifting loads ...
 -
 www.safetygoodwe.com Topic: Safety Article Reporting Safety Observation ReportingSafety observation is a process that involves employ...
 -
.jpg) www.safetygoodwe.com Elevator Safety Tips Though elevators are one of the safest forms of transportation, following simple guidelines can...
www.safetygoodwe.com Elevator Safety Tips Though elevators are one of the safest forms of transportation, following simple guidelines can...